 , and click a note or
a measure in the staff you want to mask. Click a note at the appropriate
end of the staff. The Expression Selection dialog box appears.
, and click a note or
a measure in the staff you want to mask. Click a note at the appropriate
end of the staff. The Expression Selection dialog box appears.The following instructions give measurements in points (1/72 inch). If you’ve been working in different units, choose Shape Designer > Rulers and Grid and select Points (with grid lines every 6 points).
, and click a note or
a measure in the staff you want to mask. Click a note at the appropriate
end of the staff. The Expression Selection dialog box appears.The technique: if you want to cover up everything, attach the expression to a subsequent note. In the following illustration, you can see the difference.
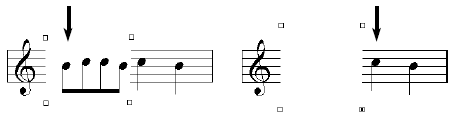
At left, the Expression was attached to the first eighth note, as indicated by the arrow. As a result, the shape only covers up the staff lines. If the shape is attached to a following note (right), the mask covers everything.
If your shape is an expression, however, the white rectangle will always cover everything, including the notes.
|
Finale User Manual Home
|

|